Photo by Museums Victoria on Unsplash
Introduction
In the previous blog post “Part1” we worked on understanding how Azure Event Grid subscribe/filter/scope different resources events creation or deletion. This is part 2 where we will use what the event captures to trigger Azure Functions against Azure VMs and Pure Cloud Block Store via Azure PowerShell Modules and Pure PowerShell SDK. The main purpose here is to automate storage provisioning for Azure VMs running in a scoped resource group. Once the VM is up, a Pure volume will be attached and ready to be written to.
Look back at the Solution Diagram
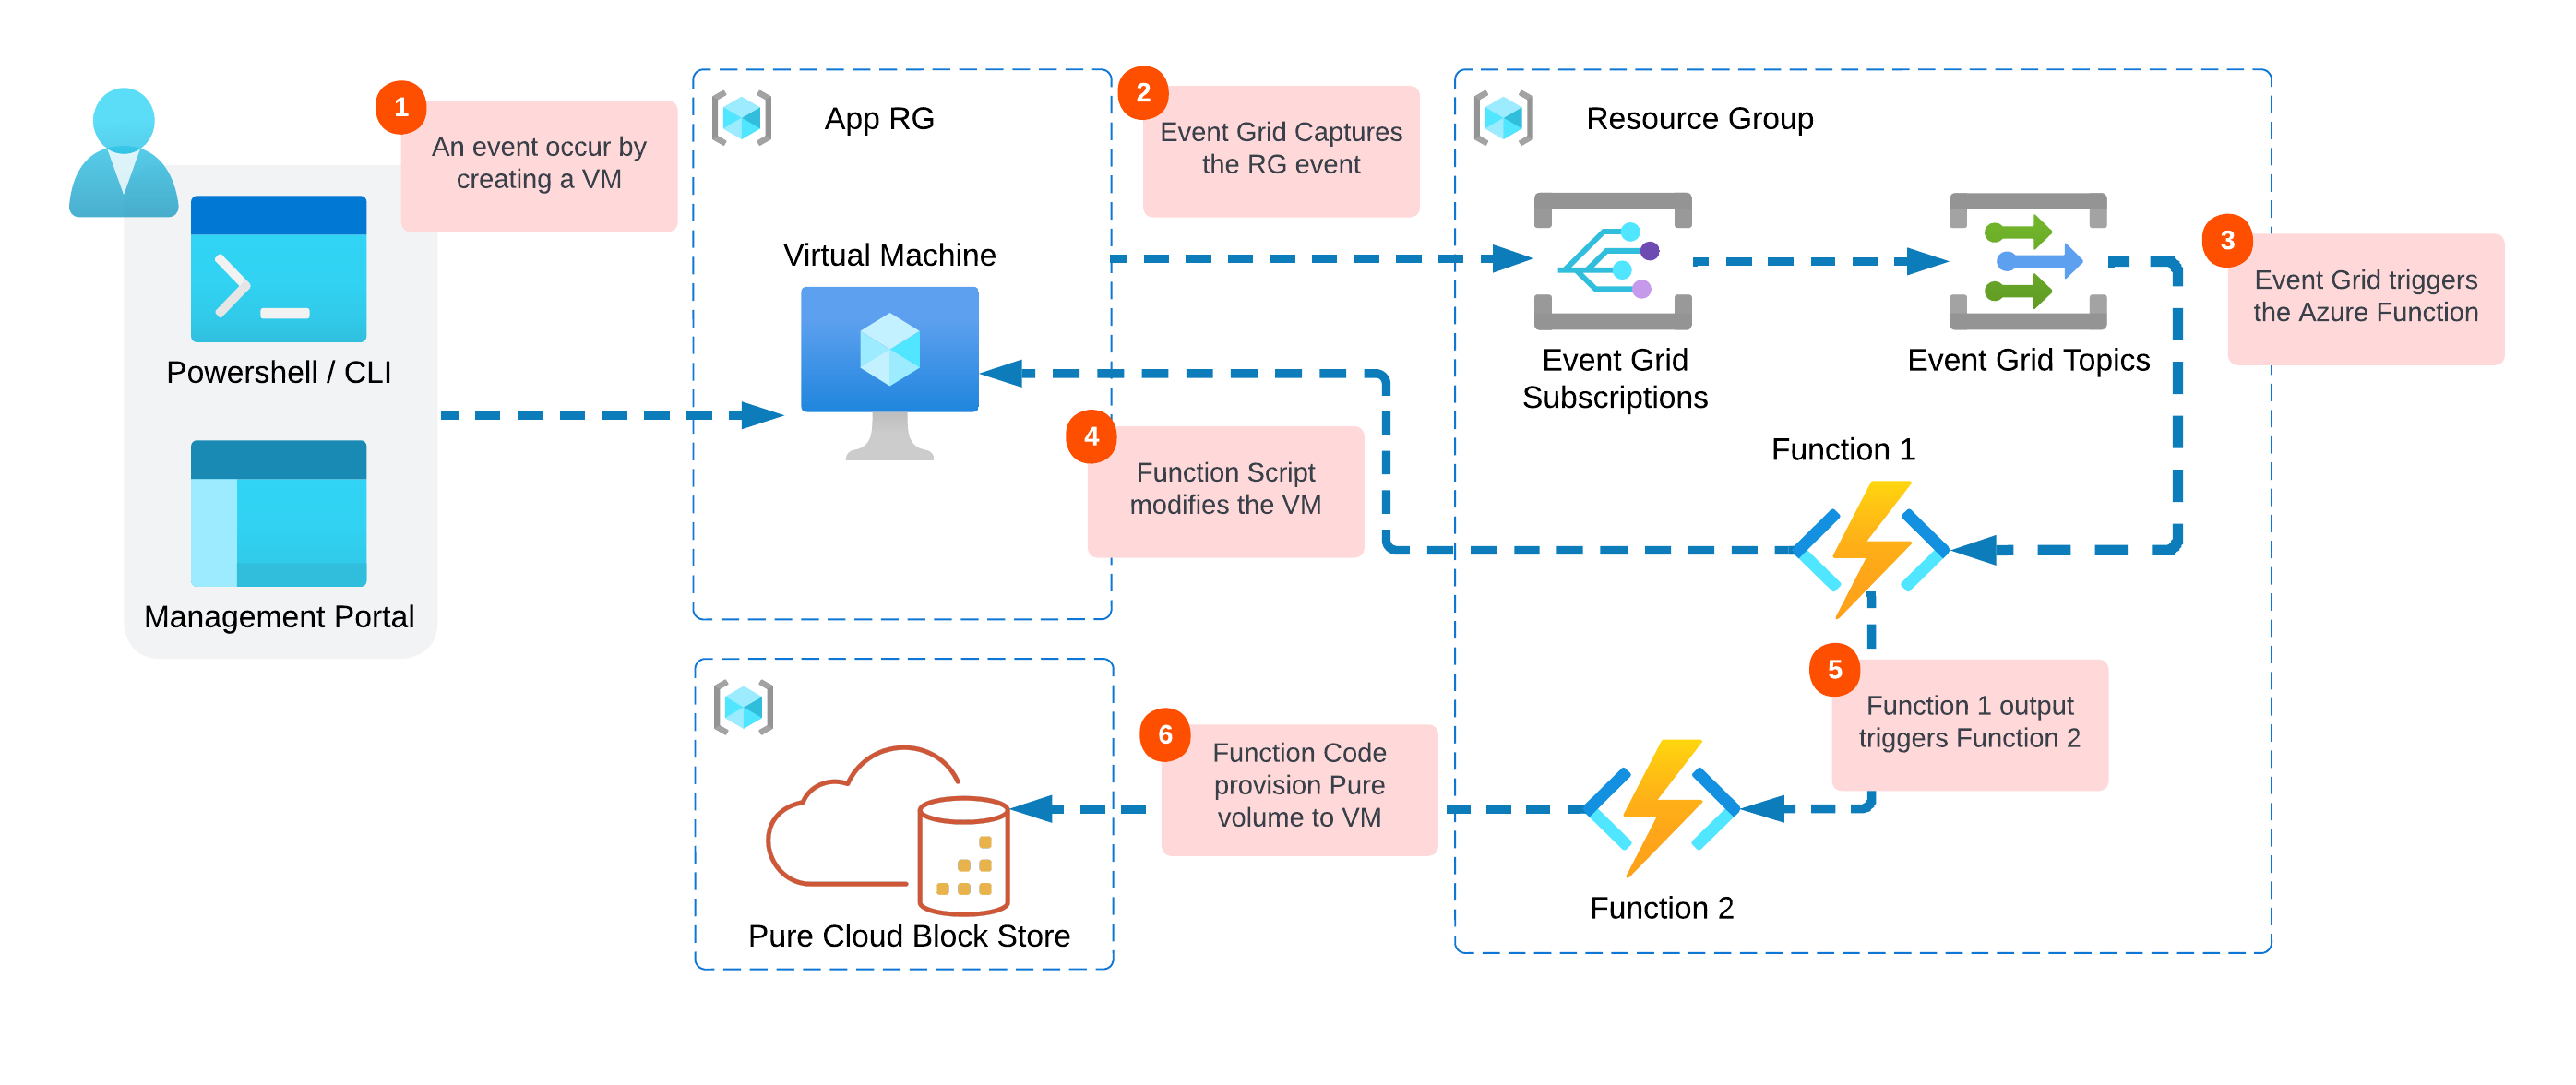
In Part 1, we made it up to step 3, let’s work now towered successfully finishing the solution diagram workflow.
- Azure VM is being created in a specific Resource Group
- The VM creation event will be captured by Azure Event Grid.
- Event Grid will trigger an Azure Function (1) written in PowerShell (You can choose your scripting language of choice).
- The script will then modify the VM. In this example since I care about following Pure Cloud Block Store best practices. The script will configure the machine with iSCSI and MultiPath configuration.
- Another Function (2) will be triggered by the completion of Function (1) and it will pass all the VM information.
- Finally Function (2) will provision Cloud Block Store volume via in-guest iSCSI to the created Azure VM.
To scope the remaining work, We have first to investigate and achieve the following:
- Figure out how to make Azure Function (1) to run scripts against Azure VMs using Azure PowerShell.
- Find a way how to configure Azure Function (2) with VNet network so it can execute Pure Storage PowerShell SDK against Cloud Block Store.
- Chain the two functions together, once the first completes the second will start and finish the overall workflow.
Run VM Commands via Azure Function
Azure has the functionality to run commands after the VM is powered on. and it can be done from the portal, Azure CLI, or – lucky me – Az PowerShell Module using this command Invoke-AzVMRunCommand.
I have used this before with Azure Automation Runbooks. So it was an easy concept for me to repeat here, I just need to write the script for configuring the Azure VM as an iSCSI initiator.
Link to Azure Automation Runbook use case » Cross-Region Azure VM Disaster Recovery with Azure Site Recovery and Pure Cloud Block Store
With Invoke-AzVMRunCommand you can add the script or commands you want to execute as one line or as a file path.
Add PowerShell Modules to Azure Function
To use PowerShell Modules in any machine you have to either install/import from the gallery, or add them to the requirements.psd1 file. Azure Function has this functionally of the App level, where you can (1) navigate to App files, (2) select requirements file, (3) add the required modules to the object list.
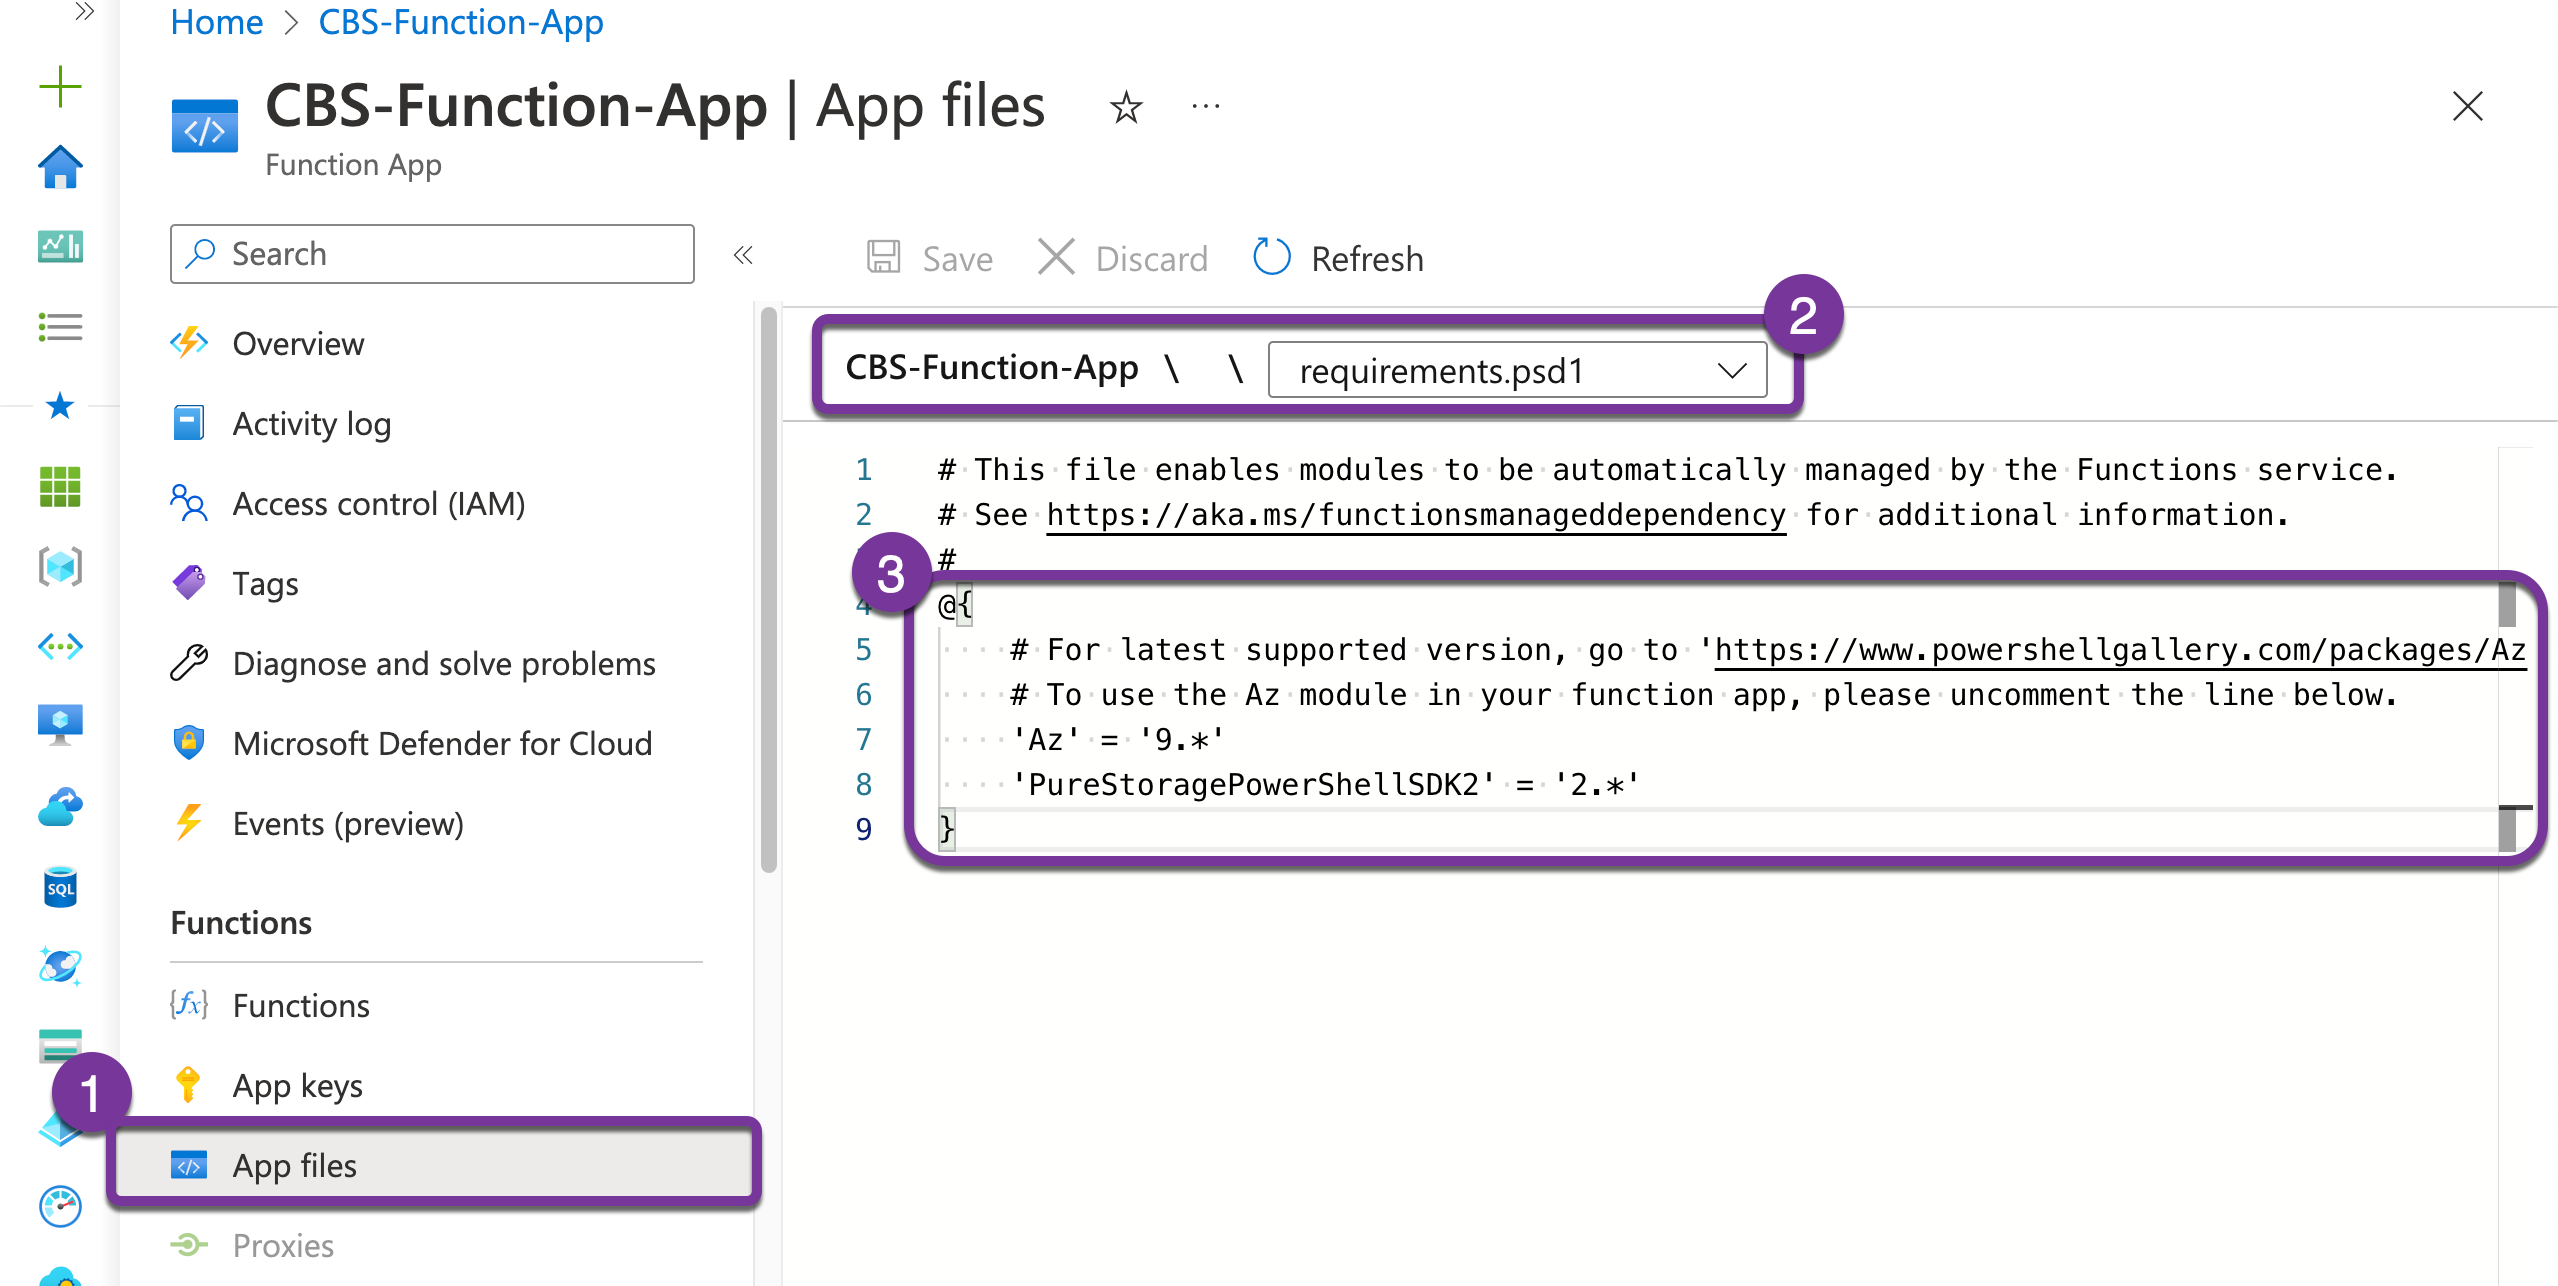
As you can see in the screenshot above, I have added Az module and PowerShell SDK v2 module. You can check out the latest versions from here for Azure, and here for Pure.
@{
    'Az' = '9.*'
    'PureStoragePowerShellSDK2' = '2.*'
}
However, running those modules in a function requires authentication to Azure and Pure CBS. Additionally, Pure CLoud Block Store is only accessible within the VNet it reside at, so I will need to add network connectivity to the function. And that’s what I will cover in the next two section.
Configure Azure Function Managed Identity
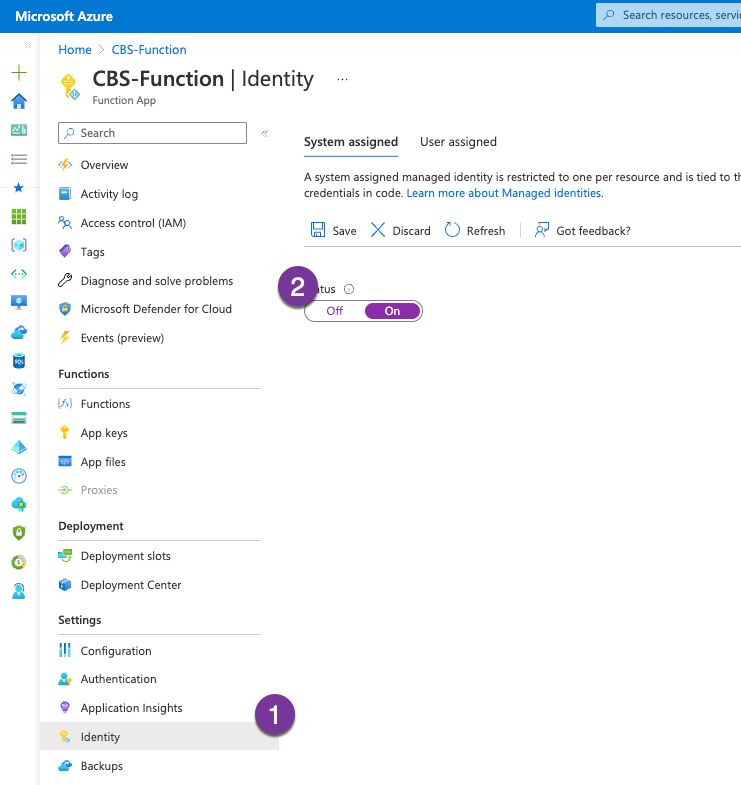
I am sure there has to be a couple of different ways to give a Function App the ability to run Az module commands within Azure Subscription. The easiest way that worked for me is to go to Identity and configure the System assigned identity.
 To test that I have access, I will add the below to my function and Test/Run it.
Connect-AzAccount -Identity
Get-AzResourceGroup | convertto-json | Write-Host
Configure Azure Function with VNet
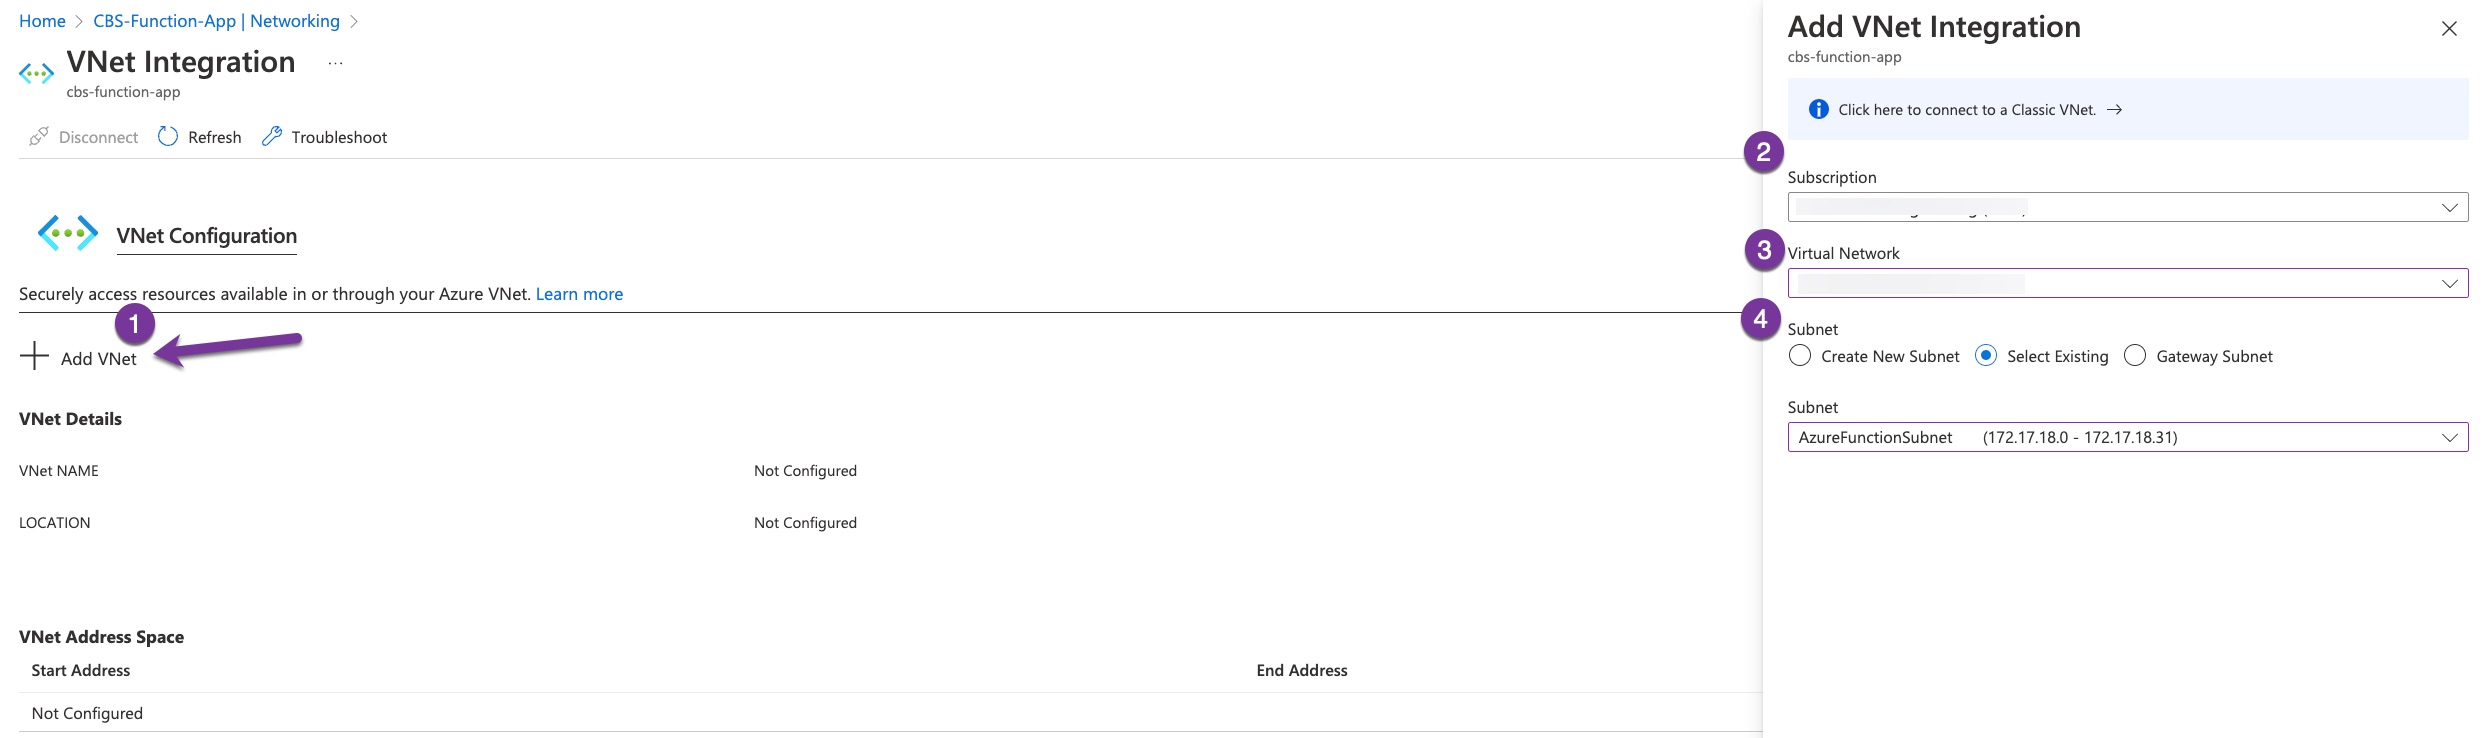
Azure App Service where the function are hosted has virtual network integration feature enables your apps to access resources in or through a virtual network. Two consideration to follow here:
- This feature is only included with the Basic, Standard, Premium, Premium v2, and Premium v3SKU offerings. So make sure to create your App Service with those SKU.
- The second requirement is to have the App Service deployed on the same region where Pure CBS VNet is located.
Connecting the function with Pure CBS virtual network is pretty straightforward. From the lift-side panel of the function app, click Networking, then click VNet Integration under Outbound Traffic.
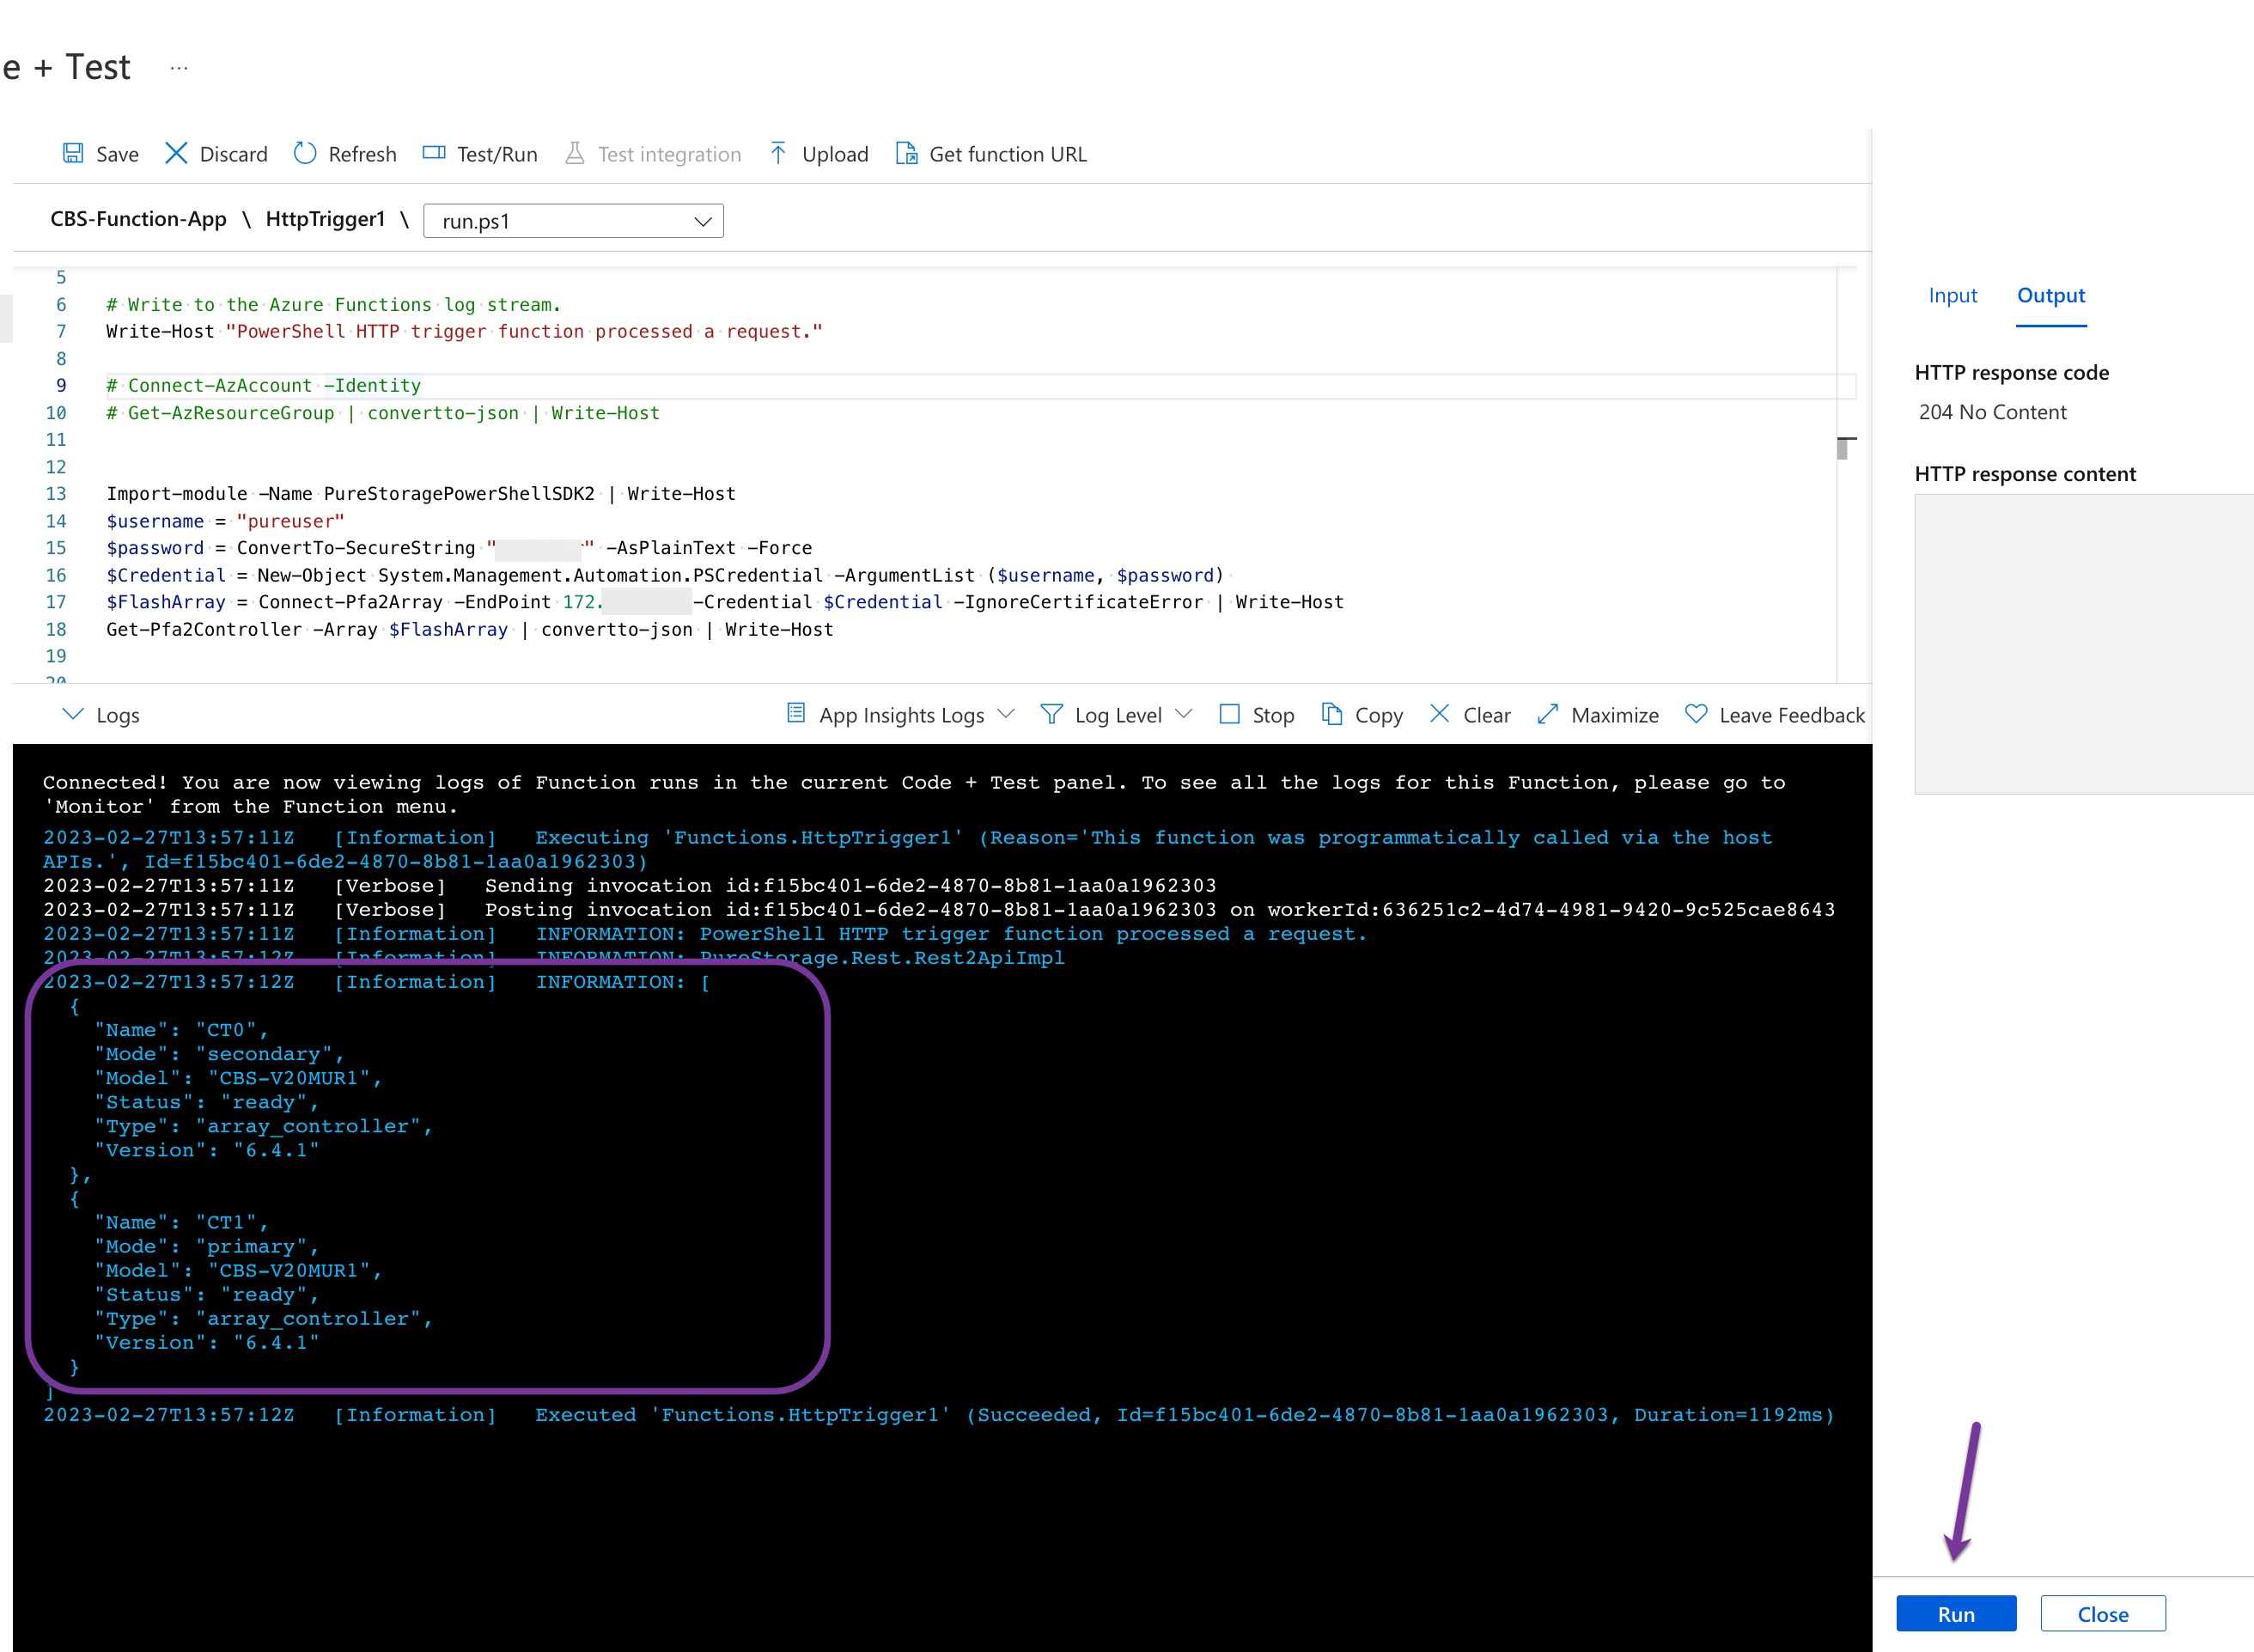
Let’s test the above by adding these lines to our function code, you can comment the rest if you wish. Here I am just querying the array controllers.
$username = "pureuser"
$password = ConvertTo-SecureString "pureuser" -AsPlainText -Force
$Credential = New-Object System.Management.Automation.PSCredential -ArgumentList ($username, $password)
$FlashArray = Connect-Pfa2Array -EndPoint {CBS IP or FQDN} -Credential $Credential -IgnoreCertificateError
Get-Pfa2Controller -Array $FlashArray | convertto-json | Write-Host
(Optional) Chain Azure Functions together
To trigger an Azure Function after the completion of another Azure Function and pass the output, you can use Azure Event Grid and its custom events.
When I scoped the work for this solution I thought it would be easy to chain function but it seems it has its own learning curve and it is not as intuitive as I imagined it to be, so I will keep this to a different blog post. For now we can combine both function codes, It will take longer to complete, but I think i am working tower functionality here not function efficiency which is again another topic to be discussed separately.
Giving the Solution a Spin
Here are the piece of code I tested the solution with. If you are following make sure you are creating an Azure VM in the scoped Resource Group, and your Pure Cloud Block Store is reachable.
using namespace System.Net

param($EventGridTrigger1,$TriggerMetadata)

# Write to the Azure Functions log stream.
Write-Host "Event Grid trigger function processed a request. A VM has been created"

# Authenticate to Azure
Connect-AzAccount -Identity

# Extract the VM name and resource group from the event data
$body = $EventGridTrigger1
$AzureVMId = $body.subject
$VM = Get-AzVM -ResourceId $AzureVMId

# Perform the required actions using the extracted VM details
$IQN = "iqn.purestorage.2009.com.$($VM.Name)"

# TO-DO convert to Params
$iSCSITargetIPAddress = 10.x.x.x
$ManagementIPAddressCBS = 10.xx.xx.xx
$VolumeSize = 1TB

# Authenticate and Access Pure Cloud Block Store
Import-Module -Name PureStoragePowerShellSDK2
$username = "pureuser"
$password = ConvertTo-SecureString "pureuser" -AsPlainText -Force
$Credential = New-Object System.Management.Automation.PSCredential -ArgumentList ($username, $password)
$CBSArray = Connect-Pfa2Array -EndPoint $ManagementIPAddressCBS -Credential $Credential -IgnoreCertificateError

# Provision Storage
New-Pfa2Host -Array $CBSArray -Name $VM.Name -Iqns $IQN

# Create a new volume
New-Pfa2Volume -Array $CBSArray -Name $VM.Name -Provisioned $VolumeSize

# Connect volume to host
New-Pfa2Connection -Array $CBSArray -VolumeNames "$($VM.Name)_Vol" -HostNames $VM.Name

# The following RunCommand is only for Ubuntu Linux Machine
$Command =
@"
# Install required packages
sudo apt-get update
sudo apt-get install -y open-iscsi multipath-tools

# Configure iSCSI
sudo echo "InitiatorName=$IQN" > /etc/iscsi/initiatorname.iscsi

sudo systemctl restart iscsid open-iscsi

# Discover iSCSI targets
sudo iscsiadm -m discovery -t st -p $iSCSITargetIPAddress

# Log in to the iSCSI targets
sudo iscsiadm -m node --login

# Verify that the iSCSI devices are available
sudo iscsiadm -m session

# Configure multipath
sudo systemctl enable multipath-tools
sudo systemctl start multipath-tools
sudo multipath -ll

# Mount volume
sudo mkdir /cbs
DISK=$(sudo multipath -ll | awk '{print $1;exit}')
sudo mount /dev/mapper/$DISK
"@
# Save the command to a local file
Set-Content -Path .\script.sh -Value $Command
(Invoke-AzVMRunCommand `
    -ResourceGroupName $VM.ResourceGroupName `
    -VMName $VM.Name `
    -CommandId 'RunShellScript' `
    -Parameter @{"param1" = "$iSCSITargetIPAddress";"param2" = "$IQN"} `
    -ScriptPath '.\script.sh').Value[0].Message
The script above is perfected yet, there is a lot of improvement can be added to it. Such as using parameters, supporting Windows VMs, ect …
Putting It All Together
Event-driven approach is definitely something I will be investing more time learning and investigating different use cases and integration points. For now let me close this by sharing the three key points I got out of this experience:
- Event-driven architecture is an approach to designing systems that are not really natively work together and turn it to well-integrated services.
- When building with an event-driven as your design principles, you end up decoupling the components and service, reducing the overall complexity of your solution, and make reusable.
- With event-driven approach, you can build highly scalable and responsive applications that can handle predicated or unexpected events.
comments powered by Disqus